At the 2025 USITT National Conference, my partner-in-crime Dr. Jennifer Leigh Sears Scheier and I coordinated a hands on lab on Taping out the Rehearsal Hall. I figured that some of our most popular “stations” would be two-tape triangulation and taping circles via the Ruth E. Kramer method, both of which are past blog posts I’ve written. We also had a station combining the two methods into a practical situation. Taping circles, which we presented several years ago, was still the winner of popularity, with second place waffling between triangulation and a station about dance numbers and quarter marks (also past blog topics). We also had a two-part station for measuring via the up-and-over method, and then transferring it to the floor, both doing so as accurately as possible, which can be tricky. Rounding things out, we had stations about the prep part of taping out. Again, I have a past blog post about figuring out how to fit in the rehearsal hall, and I will likely add one about the various rehearsal hall templates you can make (we had samples of them at the lab), but the station that was MUCH more popular than we anticipated was simply on how to read an architect’s scale ruler. Let’s add it to the blog post topics now!
Check for Architect’s vs. Engineer’s Scale
First off, you want to make sure you use an Architectural Scale Ruler, with divisions by ½ or ¼ , etc., on the edges. If your edge has numbers by 10s, it’s likely the Engineering Scale and not the one you want. A “standard” scale ruler has three sides (so is triangle-ish from the side) and is slightly longer than a regular foot-long ruler.
Ace Mentor Tools has this visual to make sure you’re using the right ruler. If you want to dive further into the differences between ruler types and how to use them, read this PDF from FEMA. (This isn’t necessary, just extra nerdiness…)
The sides of the ruler have 10 different scales on them – some go left to right and others right to left from the same view point. There are 3 sides, and each has up to 4 scales visible, requiring flipping for two of them. [Why aren’t there 12 scales? It’s because there are two different ways to read a full/1” scale on the ruler, and one of those doesn’t have any “partner” on its side.]
What if you don’t own a scale ruler?
First, do try to get your company/organization/school to purchase some for the department, rather than yourself. That said, you can print your own versions, too. Be sure to print at 100% instead of fit-to-print. Also, from experience, I would recommend printing on white cardstock…and not any other color. Below are two current options, and there are likely more online.
Archtoolbox has a printable that forms a 3D ruler similar to the purchased rulers. I do think it’s a little tricky to fold accurately. You actually get two choices with this document, and the first is a set of scales that all only face one direction . You don’t have to fight reading the “wrong” set coming from the other direction. That’s handy.
Ace Mentor Tools has a 3-page printable that looks like the standard ones I’m used to seeing with red, green and blue stripes down them, and you only have to print off the one page you need. That said, my ruler has a GREEN stripe for the one I use the most, whereas the same scales are on the RED one of the PDF. Print that one page and you’ll have ½, ¼, ⅛ and full scale on one piece of paper. Of the two files I list, the middle page of this document is the one I prefer and has the scales I use most.
How to read and use the ruler
While researching what was available online, I found this great 7-minute video from WeldNotes.
As the video shows, an architect’s scale shrinks the actual dimensions of an item (in our case, the groundplan) down to something that fits better on a piece of paper. I love the WeldNotes visuals for how things are shrunk, as well as explaining why sometimes there are 12 marks in the “tiny” end of the scale, and sometimes only 6, etc. Pay attention to that! The video also helps explain why there are numbers to avoid/ignore looking at because two scales are on the same side. It next explains how to start by putting the point at zero, then sliding your ruler for full feet, and finishing by figuring out the inches of your dimension – watch the video because he’s better than I could ever be typing it out. He’s also then got several great practice sessions, including a trickier one in ⅛” scale to test your skill. (Bonus, you get a cute dog helper to remind you to “paws” the video while thinking.)
Stage Manager Shay Garber was running that lab station at USITT on reading scale rules, so I asked her afterwards what were some of the biggest questions people had. “There weren’t any specific questions that came up. It was more refreshing for those who had used one before and building confidence. Reminding them it takes practice. I had to keep reminding them that there was no math involved, simply reading the scale ruler. Most of them, upon trying it, didn’t always align with the zero at first. So I showed them how to read inches. I could see it clicking!”
Another stage manager friend also pointed out how her students are often freaked out by the math, but we’re not “mathing” here, we’re just reading! Okay, maybe we are adding in a half inch, if it’s between two hash marks on your ruler, but not big math calculations at all.
For additional practice beyond the video above, here are some printouts (the second bullet point was one of our lab worksheets):
- Kent Collins’ Half Hour Call Scale Ruler Worksheet
- Practicing Scale Measurements – This document was uploaded to one of my Facebook groups by Shana Butterworth back during the height of the pandemic. Because of the way this worksheet is designed, you can practice reading measurements without needing a ruler handy. (You are reading lengths next to a printed ruler, so “fit to print” won’t screw you up for this one.)
When it comes to taping out, our results are going to be much more accurate when working off a ½ inch scale groundplan, moderately okay when working in ¼ inch, and good luck being close if doing in ⅛ inch scale. I’ve also had some groundplans in ⅜ inch scale, as those fit decently on some paper too (and if you follow geometry, ⅜ is between the ½ and ¼ inch scales…so not a terrible choice).
Pro Tips
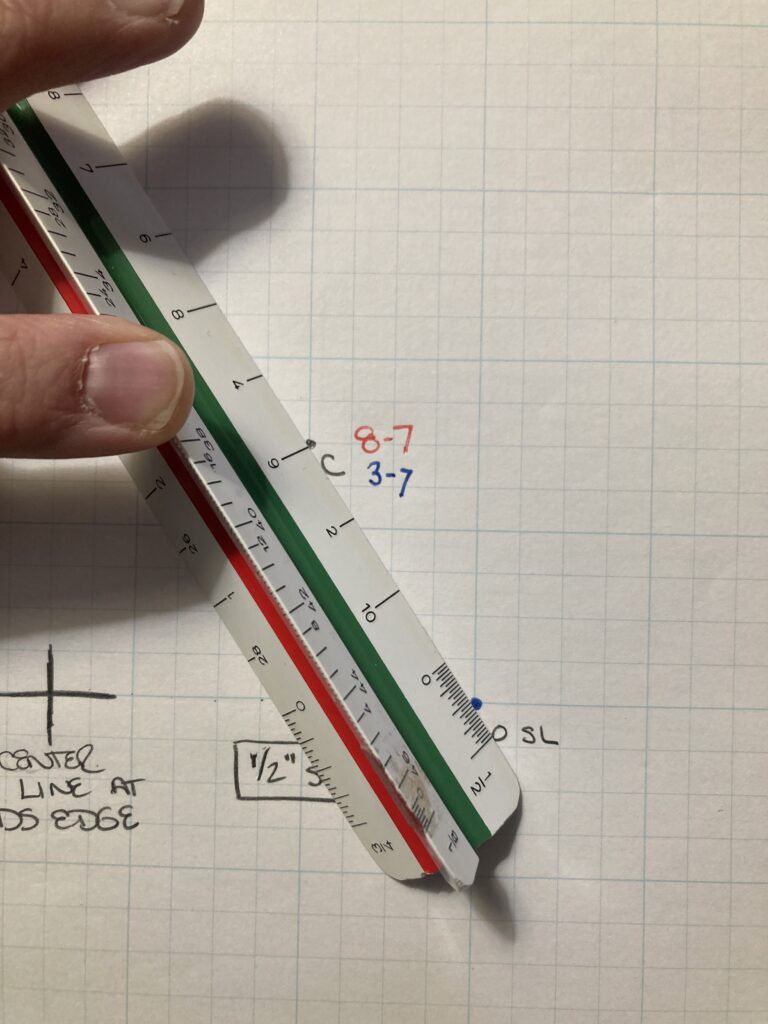
Beware the 5-8 mixup! I can’t tell you how many times I have mixed up my 5 and my 8 when measuring in half inch scale on a standard architect’s ruler. The 8 is actually coming from the left side of the ruler, which is the 1” (regular inch length) side. When these two meet each other, there is a 7 nearby, and the 6 of the ½” scale and well….I misread them often! One way I’ve solved this is I now prefer to use an 18” long scale ruler. The number opposite the 5 on that one is a 14” (and it still gives me the 5, too, as you’ll see in the picture below), and I have not screwed that up since! I also like the 18” scale ruler for big groundplans and for when I do triangulation that can often end up longer than the length of a regular ruler. [This is the ruler I have – I make no commission on this, I just love this one…so much that I gave them a review too!]
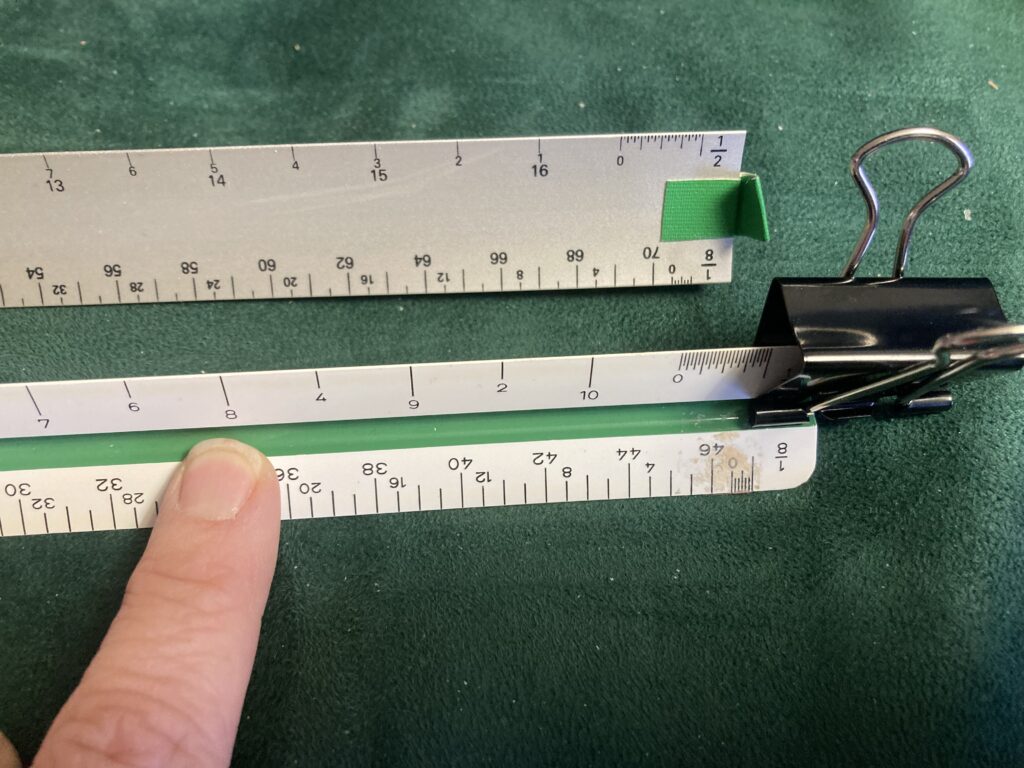
Give yourself a marker for which scale you are using. If you don’t, invariably you’ll set the ruler down, and it will turn to a different scale without your noticing. I prefer and ask for half inch scale when possible, so my 18” ruler has a tape flag off the edge to remind myself to keep that side up (see previous image). There’s more room for a tape flag on this larger ruler with the way its numbers are printed; it’s a little harder to stick one on a regular smaller one. You can also use a binder clip so that it can ONLY lay on your table with the correct side up. The binder clip of course is a lot easier to adjust to which ever scale you are using on that particular day, too. (I also found out while writing this blog that Alvin makes a scale guard for this purpose, but it looks VERY similar to a binder clip at the base…) In the image above I have it on the right so the photo would be easier, but in reality I would put it on the other end, away from the zero I’d be using constantly. Another photo later shows this. You can also see some tape residue where I once had a flag on this smaller ruler, but then needed to remove it when using the ⅛” scale another show.
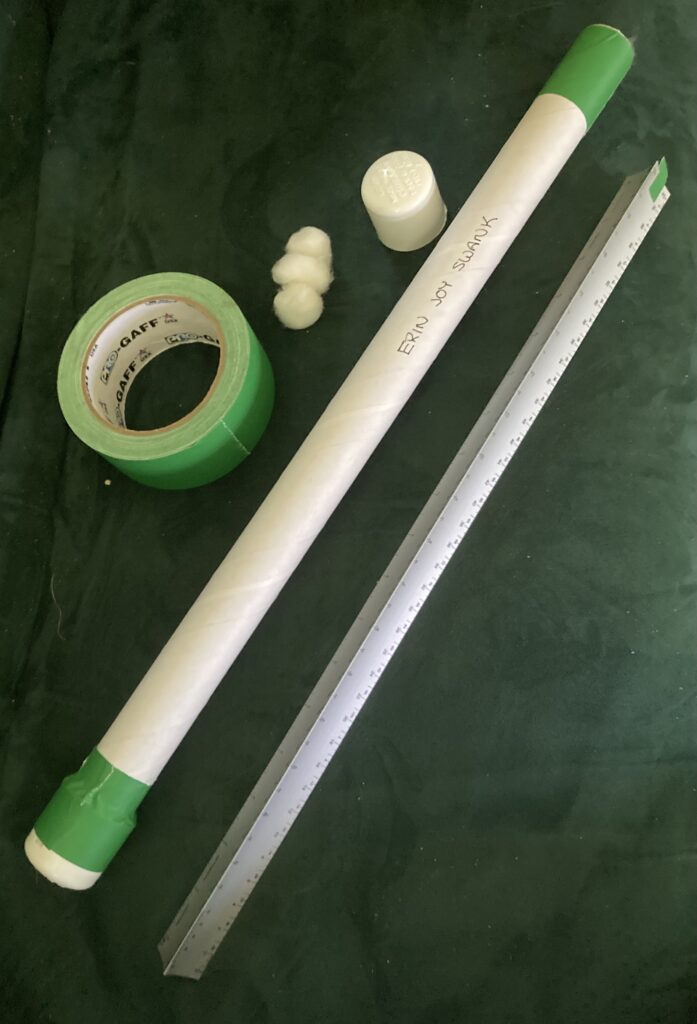
Keep your ruler in a case. One of my rulers came with its own triangular shaped plastic case, which I still have after decades of use. For my 18” one, I found a cardboard mailing tube just a little longer, placed some cotton balls in one end, and then found two PVC end caps (like the rubber tips you put on canes) that fit over the edge. One is permanently taped to one end. For the other, I built up the tube end with some more gaff tape to take up the looseness, so I can wiggle the cap on and off. I place my ruler inside and a couple more cotton balls before the cap, since my ruler is aluminum and I don’t want the ends to possibly bend or dent. The cases don’t take that much more room (especially if it was original to the packaging) and will keep your ruler looking nice and without chips or dings.
Keep an eye out for small rulers. A couple years ago I was gifted a baby scale ruler that is the size of a pen. At USITT many years ago, ETC gave out lanyards with scale rule on them. Both of these travel with me at various times. And keep that printable ruler file mentioned earlier if a physical ruler isn’t nearby.
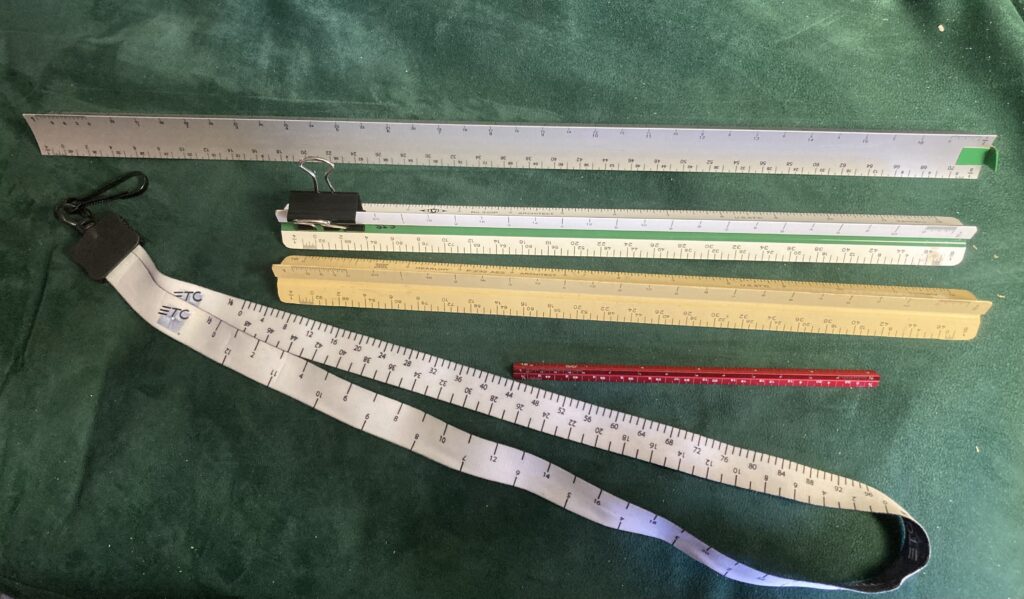
Figure out what scale your groundplan is using if it’s not easily marked. Often this is not a concern, as the designer usually puts a box of information (frequently in the down right corner), which includes the scale. If for some reason yours doesn’t have it, look for clues in the groundplan. See if there is a measurement written anywhere of how long something is (like an 8 foot long platform), and match your ruler to that. Elevations can also help you with measurements by listing out details. Beware, they may be a DIFFERENT scale so it’s easier to see details, but you can use that INFORMATION to take back to the groundplan, like knowing it’s to be an 8 foot long platform. Also, when all else fails, many, many doors are drawn as 3’ wide. Do check that your groundplan was printed at 100% and NOT fit-to-print, or all your measuring will be in vain. Of course, your designer or technical director can also help you with this information.
Still need some help reading a measuring tape itself? The same guy who did the video above has one on fractions in tape measures and rulers too.
—
If you want to see another stage manager talking about using a scale ruler, check out Kent Collins’ video. The video description includes the link to his worksheet above. I will say, I would flip that ruler around in his final example so you are reading the numbers right side up. It probably was easier for videotaping this way, though, to not create shadows.
What other tips do you have? Please share them in the comments. I’ll add others to this post as I learn them, and give you credit.
Check out additional blog posts tagged Taping the Set.